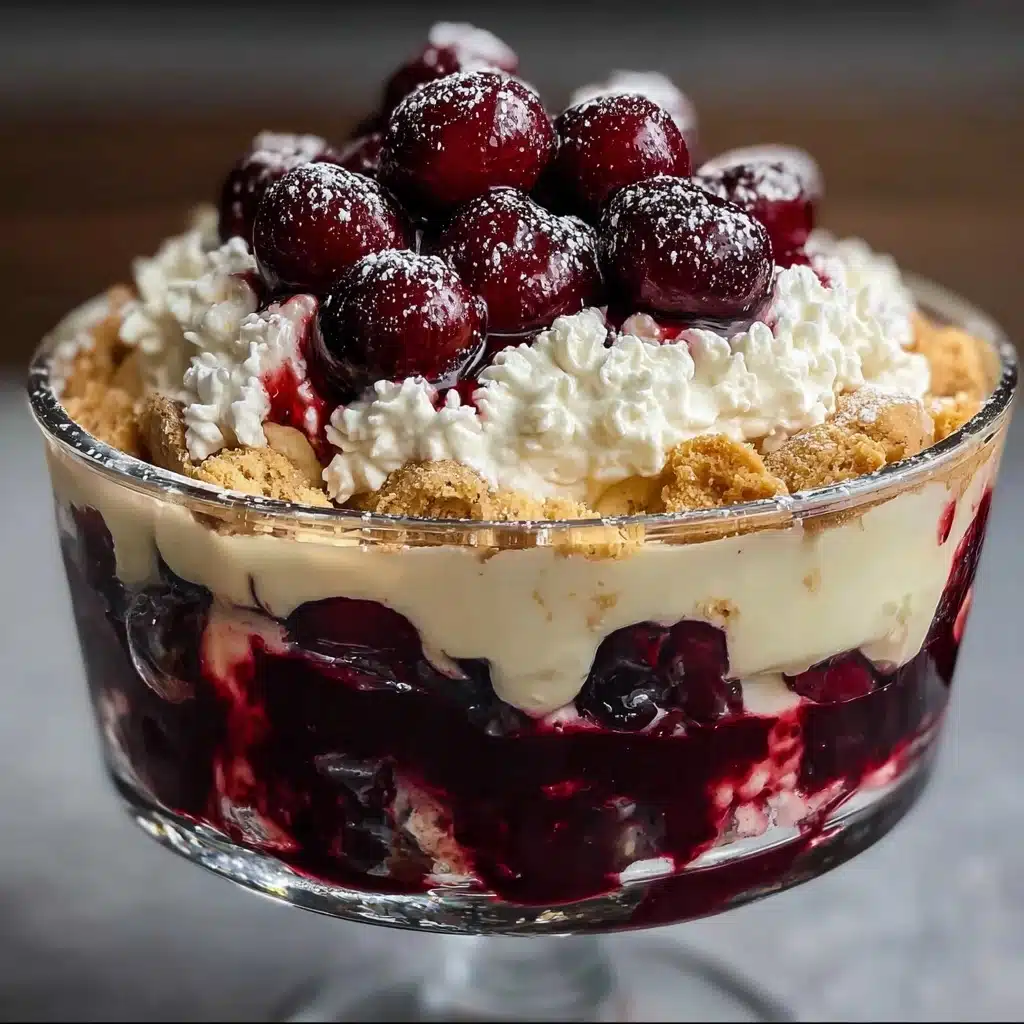
Cherry Cheesecake Trifle Recipe
Let me introduce you to the joyful, irresistible dessert that’s about to take your gatherings (or cozy nights in) by storm: Cherry Cheesecake Trifle. This easy, no-bake beauty brings together layers of creamy cheesecake filling, juicy cherries, and rich graham crackers for a showstopper that looks as good as it tastes. Whether you’re planning a picnic or celebrating something special, there’s just something magical about digging a big spoon into these pretty, colorful layers!
Ingredients You’ll Need
The beauty of Cherry Cheesecake Trifle lies in its simplicity, with each ingredient playing a starring role. These everyday staples work together to bring you that trademark blend of silky, crunchy, tart, and sweet in every spoonful.
- Fresh or Canned Cherries (2 cups): The main attraction, cherries bring a burst of tart juiciness and a pop of stunning color.
- Cream Cheese (8 oz, softened): Choose a quality brand (I’m loyal to Philadelphia) for ultra-creamy cheesecake flavor that anchors the dessert.
- Powdered Sugar (1 cup): Easily dissolves into the filling and sweetens everything without any grittiness.
- Heavy Whipping Cream (1 cup): When whipped, this transforms the cheesecake base into a lush, airy mousse-like layer.
- Vanilla Extract (1 teaspoon): Don’t skip it! Vanilla adds warmth and balances the tang of the cream cheese.
- Crushed Graham Crackers (2 cups): The classic “crust,” these crumbs add buttery crunch and unmistakable cheesecake nostalgia.
- Whipped Cream for Topping (1 cup): A final cloud of whipped cream makes everything extra dreamy and beautiful on top.
How to Make Cherry Cheesecake Trifle
Step 1: Prepare the Cherries
If you’re starting with fresh cherries, wash, pit, and slice them in half—this extra step is so worth it for juiciness and color! If you’re using canned cherries, just give them a gentle drain to remove excess syrup, keeping the texture bright and not soggy.
Step 2: Make the Cheesecake Filling
In a large mixing bowl, beat your softened cream cheese until perfectly smooth and creamy. Slowly add in the powdered sugar and keep beating until it’s all lush and combined. Finally, pour in the vanilla extract and give it another quick mix. The aroma alone will tell you you’re on the right track!
Step 3: Whip the Cream
Grab a separate cold bowl for whipping the heavy cream. Beat it until billowy stiff peaks form—this step makes all the difference for a trifle that’s light as air, but still rich and full-flavored. Once whipped, gently fold the cream into the cheesecake filling so you don’t lose that lovely fluffiness.
Step 4: Layer the Trifle
Now for the fun part: assembling your Cherry Cheesecake Trifle! In your favorite trifle dish or a large glass bowl, start with a layer of crushed graham crackers. Add a generous layer of that dreamy cheesecake filling, followed by a cascade of cherries. Repeat the layers, taking a moment to peek at the pretty stripes you’re building, and finish with a final layer of cheesecake filling.
Step 5: Top it Off
Add a billowy layer of whipped cream on top. If you’re feeling extra, crown it with a handful of cherries or a dainty sprinkle of graham cracker crumbs—this is your dessert’s “ta-da!” moment.
Step 6: Chill & Serve
Slide your trifle into the fridge for at least two hours. This short chill time lets all the layers meld together and gives each bite that iconic trifle texture. When you’re ready, dig in with a big spoon and enjoy!
How to Serve Cherry Cheesecake Trifle

Garnishes
A Cherry Cheesecake Trifle deserves to look as celebratory as it tastes! Save a few glossy cherries and a sprinkle of graham cracker crumbs for the very top. If you want to channel your inner pastry chef, add a few tiny mint leaves or curls of white chocolate for color contrast and a pretty finish.
Side Dishes
This trifle tends to steal the spotlight, but if you’re planning a dessert table, pair it with crisp butter cookies or lemon shortbread for contrast. A pot of coffee or a pitcher of iced tea rounds things out beautifully, especially for a summer get-together.
Creative Ways to Present
While a traditional trifle dish makes a dramatic centerpiece, try dividing the Cherry Cheesecake Trifle into individual glass jars or tumblers for picnics or parties. Mini mason jars are adorable and portable. For an extra-special look, create parfaits in tall glasses, letting the vivid cherry stripes shine through.
Make Ahead and Storage
Storing Leftovers
If you have any leftovers (lucky you!), cover the dish tightly with plastic wrap or a lid and refrigerate. The Cherry Cheesecake Trifle will keep beautifully for up to 3 days; the flavors even deepen a bit, and the graham layers turn pleasantly soft.
Freezing
While you technically can freeze the assembled trifle, I recommend enjoying it fresh for the best texture. Cream cheese and whipped cream fillings tend to turn grainy or separate after thawing. However, you can freeze the cheesecake layer on its own, then thaw and assemble with fresh cherries and crumbs when ready.
Reheating
No need for reheating here—Cherry Cheesecake Trifle is meant to be enjoyed cold straight from the fridge. If you’ve let it sit out a little too long, just pop it back in the fridge for a quick chill; it’ll perk up in no time!
FAQs
Can I use frozen cherries for this trifle?
Absolutely! Frozen cherries work perfectly if fresh aren’t in season. Just thaw them and drain very well to avoid any extra liquid in your trifle layers.
Can I make Cherry Cheesecake Trifle in advance?
Yes—you can assemble the trifle up to 24 hours ahead. In fact, letting it chill overnight makes the layers meld together beautifully for an even more flavorful experience.
Is there a gluten-free option?
Definitely! Swap out regular graham crackers for gluten-free graham-style cookies or biscuits. The rest of the ingredients in Cherry Cheesecake Trifle are naturally gluten-free.
What’s the best way to crush graham crackers?
For perfectly even crumbs, use a food processor or put the crackers in a zip-top bag and crush with a rolling pin. A few uneven bits add extra crunch and personality to each bite.
Can I add other fruits to this trifle?
Of course! Blueberries, raspberries, or even diced peaches make delicious additions or substitutions. But let’s be honest—there’s something special about the classic cherry and cheesecake pairing.
Final Thoughts
There’s just something happy and heartwarming about making Cherry Cheesecake Trifle, especially when you get to share it with the people you love. Whether you’re new to trifles or it’s an old favorite, give this recipe a try—you’ll find yourself coming back to its creamy, sweet cherry-filled layers again and again!
PrintCherry Cheesecake Trifle Recipe
Indulge in the delicious layers of this Cherry Cheesecake Trifle, a perfect blend of sweet cherries, creamy cheesecake filling, and crunchy graham crackers. This dessert is not only visually stunning but also incredibly easy to make!
- Prep Time: 20 minutes
- Total Time: 2 hours 20 minutes
- Yield: 8 servings 1x
- Category: Dessert
- Method: No-Bake
- Cuisine: American
- Diet: Vegetarian
Ingredients
Cherries:
- 2 cups fresh or canned cherries, pitted
Cheesecake Filling:
- 8 oz cream cheese, softened
- 1 cup powdered sugar
- 1 cup heavy whipping cream
- 1 teaspoon vanilla extract
Additional:
- 2 cups crushed graham crackers
- 1 cup whipped cream, for topping
Instructions
- Prepare the Cherries: If using fresh cherries, wash, pit, and slice them in half. If using canned ones, drain them well.
- Make the Cheesecake Filling: In a mixing bowl, beat the softened cream cheese until smooth. Gradually add the powdered sugar and continue beating until well combined. Add the vanilla extract and mix again.
- Whip the Cream: In a separate bowl, whip the heavy cream until stiff peaks form. Gently fold the whipped cream into the cream cheese mixture until they are well combined. This gives us that light and airy cheesecakey goodness!
- Layer the Trifle: In a trifle dish or any large glass bowl, start layering. Begin with a layer of crushed graham crackers, followed by a layer of the cheesecake filling, and then a layer of cherries. Repeat the layers until you run out of ingredients, finishing with a layer of cheesecake filling on top.
- Top it Off: Spoon the whipped cream on the very top, and if you’re feeling fancy, add some additional cherries or a sprinkle of graham cracker crumbs for decoration.
- Chill & Serve: Let the trifle chill in the fridge for at least 2 hours—this will really help all those flavors meld together. When you’re ready to serve, dig in with a big spoon!
Nutrition
- Serving Size: 1 serving
- Calories: 380
- Sugar: 26g
- Sodium: 230mg
- Fat: 24g
- Saturated Fat: 13g
- Unsaturated Fat: 9g
- Trans Fat: 0g
- Carbohydrates: 38g
- Fiber: 2g
- Protein: 4g
- Cholesterol: 70mg
Keywords: Cherry Cheesecake Trifle, Dessert Recipe, No-Bake Dessert, Trifle Recipe

