Apple Slab Pie Recipe
If you’re looking for a show-stopping dessert that’s perfect for parties, potlucks, or basically any gathering where you want to win friends and influence people, let me introduce you to Apple Slab Pie. This glorious, oversized creation takes everything you love about classic apple pie — buttery crust, juicy apples, and cozy spices — and super-sizes it for a crowd. Not only does it serve a lot of people, but it also comes together easier than you might expect, and those thick, golden slices are impossible to resist. If apple pie is joyful and nostalgic, then Apple Slab Pie is its life-of-the-party older sibling.
Ingredients You’ll Need
The magic of Apple Slab Pie starts with truly simple ingredients. Each one plays a part in creating that perfect balance of tender crust, perfectly spiced apples, and a gorgeous golden finish that’ll have everyone reaching for seconds.
- All-purpose flour: This is the backbone of the flaky crust, providing the structure that holds all those luscious apples together.
- Sugar: Just enough to sweeten both the crust and the apple filling, so every bite is pleasantly balanced.
- Table salt: It may seem small, but a dash brings out the flavors of the butter and apples.
- Unsalted butter: Cold, cubed butter gives your crust that beautiful, tender flakiness everyone loves.
- Very cold water: The secret to perfect pie dough — it keeps everything cool so your crust stays crisp.
- Apples: Choose your favorites; I love a mix of tart and sweet varieties for the best flavor (chopped into cheerful, bite-sized chunks).
- Lemon juice: A quick squeeze brightens your filling and keeps the apples tasting fresh.
- Cornstarch: This thickens the filling so every slice holds together beautifully.
- Ground cinnamon: Essential for that classic, warm apple pie aroma.
- Ground nutmeg: Just a sprinkle rounds out the spices and adds depth.
- Ground allspice: A pinch adds a little extra magic to the flavor.
- Heavy cream or beaten egg wash: Either lends a shiny, golden finish that makes your Apple Slab Pie look bakery-worthy.
How to Make Apple Slab Pie
Step 1: Make the Pie Dough
Start by whisking together flour, sugar, and salt in a big, wide bowl. Toss in those super cold butter cubes and quickly work them in with your fingertips until the mix looks like chunky crumbs the size of peas. Add cold water, little by little, stirring gently until the dough just starts holding together. Gather it up into two pieces (one a bit bigger than the other), shape them into thick rectangles, wrap, and chill for at least two hours. Good pie dough needs some time to rest and hydrate — it’s so worth it!
Step 2: Prepare the Apple Filling
Grab your largest bowl and toss the apple chunks with a squeeze of lemon juice for tart brightness. In a separate bowl, mix together sugar, cornstarch, spices, and salt. Scatter this spiced-sugar mixture over the apples and toss everything together until each piece is deliciously coated. The apples will start releasing their juice, which is exactly what you want.
Step 3: Assemble the Slab Pie
Preheat your oven to 375°F and line a 10×15-inch rimmed baking sheet with parchment. Roll out the larger piece of dough into a generous rectangle and gently drape it into your prepared pan, letting the edges hang over a bit. Pop it in the fridge or freezer while you roll out the remaining dough for the pie top. Keeping your dough really cold at every step is key for maximum flakiness.
Step 4: Fill and Cover
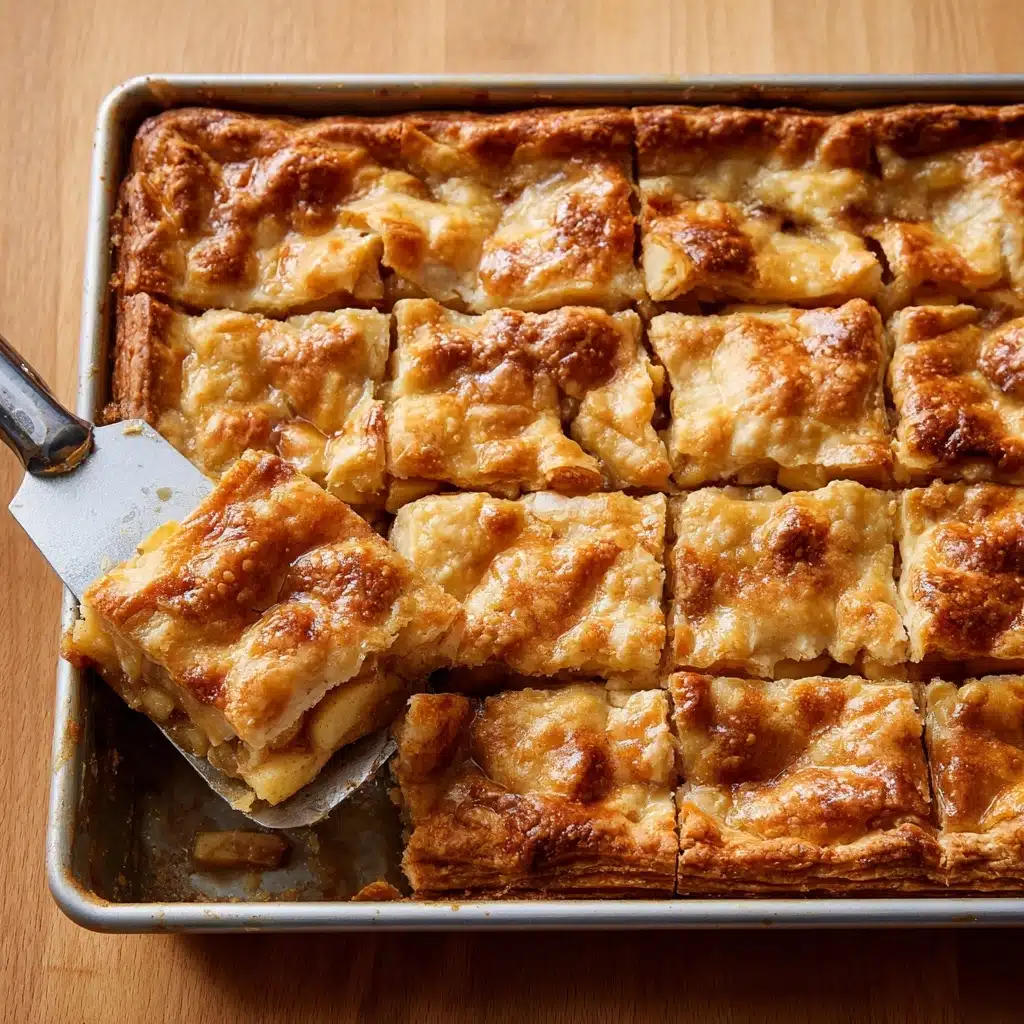
Take the crust-lined pan from the fridge and load it up with all of your apples and their juicy goodness. It’ll look like a lot, but they’ll bake down just right. Lay the top crust over the apples, trim the edges so both layers hang about three-quarters of an inch, then crimp the edges together to seal in those bubbling juices. Brush the top with cream or egg wash for that perfect golden hue, and don’t forget to cut plenty of slits for steam to escape.
Step 5: Bake and Cool
Set your pie on top of a larger baking sheet (extra insurance against drips!) and bake until the crust is deeply golden and juices bubble through, about 40 to 45 minutes. Let the Apple Slab Pie cool on a rack for at least 45 minutes before slicing. It’s hard to wait, but letting it rest helps those beautiful squares hold together.
How to Serve Apple Slab Pie
Garnishes
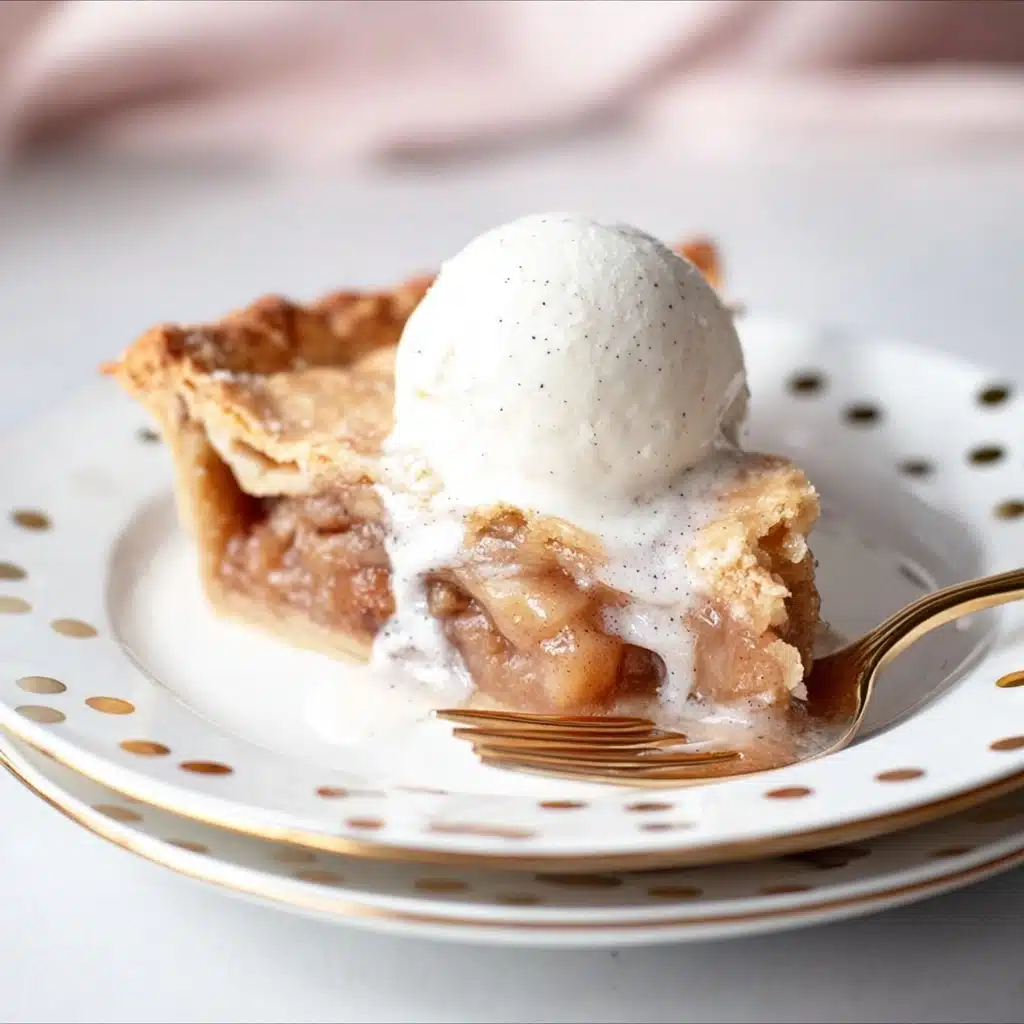
To make every serving truly special, try a sprinkle of powdered sugar, a scoop of vanilla ice cream, or a generous drizzle of warm caramel sauce. Each garnish adds its own little touch of delight to every bite of Apple Slab Pie.
Side Dishes
This pie shines on its own, but if you want a full dessert spread, serve alongside a bowl of fresh berries, a dollop of whipped cream, or a spoonful of crème fraîche. The lightness of these sides balances the wonderful richness of the pie.
Creative Ways to Present
Cut the Apple Slab Pie into neat squares for easy sharing, or try using a cookie cutter for festive shapes in the colder months. Stack slices on a tiered platter, or package them in wax paper for the prettiest edible party favors you’ve ever seen.
Make Ahead and Storage
Storing Leftovers
Leftover Apple Slab Pie can be covered tightly and kept in the refrigerator for up to four days. The crust will stay lovely, and the flavors deepen as it sits — if you have any leftovers at all!
Freezing
You can freeze slices or even the entire pie once baked: wrap pieces individually, then store them in a zip-top bag. This will keep your Apple Slab Pie fresh for up to three months. Thaw at room temperature or in the fridge when ready to enjoy.
Reheating
To get the crust delightfully crisp again, simply warm slices in a 350°F oven for about 10 minutes. If you’re in a hurry, a quick zap in the microwave works too — just know the crust will be a bit softer, but still delicious.
FAQs
What kind of apples are best for Apple Slab Pie?
A blend of tart and sweet apples (like Granny Smith and Honeycrisp) creates a good texture and flavor contrast. Mixing varieties is the secret to a more three-dimensional apple flavor!
Can I make the dough in advance?
Absolutely! The dough for Apple Slab Pie can be made a day or even two ahead and kept, tightly wrapped, in the fridge. You can also freeze the dough for up to a month — just thaw overnight before rolling.
Do I have to use egg wash?
Nope! Brushing with heavy cream works just as well for a beautiful golden crust. Egg wash gives a slightly shinier finish, while cream is a touch more rustic but equally tasty.
Can I add other fruits or berries to the filling?
Yes! While traditional Apple Slab Pie is all about apples, you can mix in pears, cranberries, or even a handful of raspberries for a fun twist. Adjust the sugar as needed based on the tartness of your chosen fruits.
Do I need a special pan for slab pie?
A 10×15-inch rimmed baking sheet or jelly roll pan is ideal, but don’t stress if yours is a bit smaller or larger — just roll the dough to fit, and adjust the filling accordingly (you might have leftovers for a mini pie or pocket pies!)
Final Thoughts
If you’ve never made an Apple Slab Pie before, this is your sign. It’s a wonderful, crowd-pleasing way to share all the warmth and comfort of apple pie with everyone at your table. Once you see how easy and satisfying it is, it just might become your new favorite pie for any occasion — happy baking!
PrintApple Slab Pie Recipe

Indulge in this delicious and comforting Apple Slab Pie, a perfect dessert for gatherings or a sweet treat for the family. With a buttery crust and a spiced apple filling, this pie is sure to be a crowd-pleaser.
- Prep Time: 30 minutes
- Cook Time: 45 minutes
- Total Time: 3 hours
- Yield: 1 10×15-inch slab pie 1x
- Category: Dessert
- Method: Baking
- Cuisine: American
- Diet: Vegetarian
Ingredients
For the crust:
- 3 ¾ cups (470 grams) all-purpose flour
- 1 ½ tbsp sugar
- 1 ½ tsp table salt
- 3 sticks (12 oz or 340 grams) unsalted butter, cubed and kept very cold
- ¾ cup very cold water
For the apple filling:
- 3 ½ to 4 pounds apples, peeled, cored and chopped into approximately ½-inch chunks (about 10 cups)
- Squeeze of lemon juice
- ⅔ to ¾ cup sugar
- 3 tbsp cornstarch
- 1 rounded tsp ground cinnamon
- ¼ tsp ground nutmeg
- ¼ tsp ground allspice
- ⅛ tsp table salt
To finish:
- 2 tbsp heavy cream or 1 egg beaten with 1 tbsp water
Instructions
- To make the crust: Measure the flour into a large, wide bowl. Whisk in the sugar and salt. Toss in the butter cubes and coat them all with the flour. Using your first 3 fingers of both hands, mash up the butter into smaller pieces, just bigger than the size of peas. You can also do this with two knives or a strong pastry blender. I prefer using my fingers. Once the mixture looks sort of uniform, slightly crumbly, and the butter is broken up, stir in ½ cup of water with a rubber spatula until the water is absorbed and the dough starts to come together. If the dough is still dry and crumbly, add up to the remaining ¼ cup of water, 1 tablespoon at a time until the dough just starts to come together. Bring the dough together with your hands until it forms a soft and almost loose ball. Divide the pie dough into two pieces, one slightly larger than the other. You’ll need the larger piece for the bottom crust. Transfer one piece to a sheet of plastic wrap and mold it into a rectangular shape, about 1-inch thick. Use the plastic wrap to help bring the dough together, if needed. Repeat with the remaining dough. Chill the dough in the refrigerator for at least 2 hours before using.
- To make the filling: In a very large bowl, toss the apple chunks with the lemon juice. Mix the sugar, cornstarch, cinnamon, nutmeg, allspice, and salt together in a medium bowl. Sprinkle the sugar-spice mixture over the apples and toss them well to coat; set aside.
- To assemble the slab pie: Preheat the oven to 375° F. Line the bottom of a 10×15×1-inch baking sheet or similarly sized jelly roll pan with a piece of parchment paper. If your pan is a little smaller than this (as mine was), don’t worry – this recipe will still work fine; you’ll just have a little extra dough leftover. Roll out the larger piece of dough on a well-floured surface with a rolling pin into an 18×13-inch rectangle. Transfer the piece to the pan and drape the edges of the dough over the sides of the pan while only gently pushing the dough down into the inside and corners of the pan. Slip the pan into the fridge or freezer while you roll out the second piece of dough into a 16×11-inch rectangle (you want to keep the dough in the pan as cold as possible). Remove the pan from the fridge/freezer and pour the apples and the juices over the dough in the pan – it may seem like way too many apples, but they will cook down. Drape the second sheet of dough over the apples. Trim the dough to where both top and bottom edges hang about ¾-inch over the edge of the pan. Seal up the edges tightly with your fingers. Brush the top of the dough with the heavy cream or egg wash. Using a sharp knife, slice a whole bunch of 1-inch slits in the top of the dough to allow the steam to escape during baking. Place the whole sheet on a larger baking sheet – there will likely be spillage that you’ll want to catch on the large pan rather than the bottom of your oven (trust me). Bake for 40 to 45 minutes, until the top crust is a nice golden brown and the filling is bubbling through the holes in the crust. Cool the pan on a wire rack for at least 45 minutes before cutting and serving (see note below).
Notes
- Be sure to let the pie cool before cutting to allow the filling to set.
- This pie is great served warm with a scoop of vanilla ice cream.
Nutrition
- Serving Size: 1 slice
- Calories: 320
- Sugar: 20g
- Sodium: 150mg
- Fat: 14g
- Saturated Fat: 9g
- Unsaturated Fat: 4g
- Trans Fat: 0g
- Carbohydrates: 45g
- Fiber: 3g
- Protein: 3g
- Cholesterol: 40mg
Keywords: Apple Slab Pie, dessert, apple pie, slab pie, baking, fall dessert


