Chocolate Mint Pinwheel Cookies Recipe
Introduction
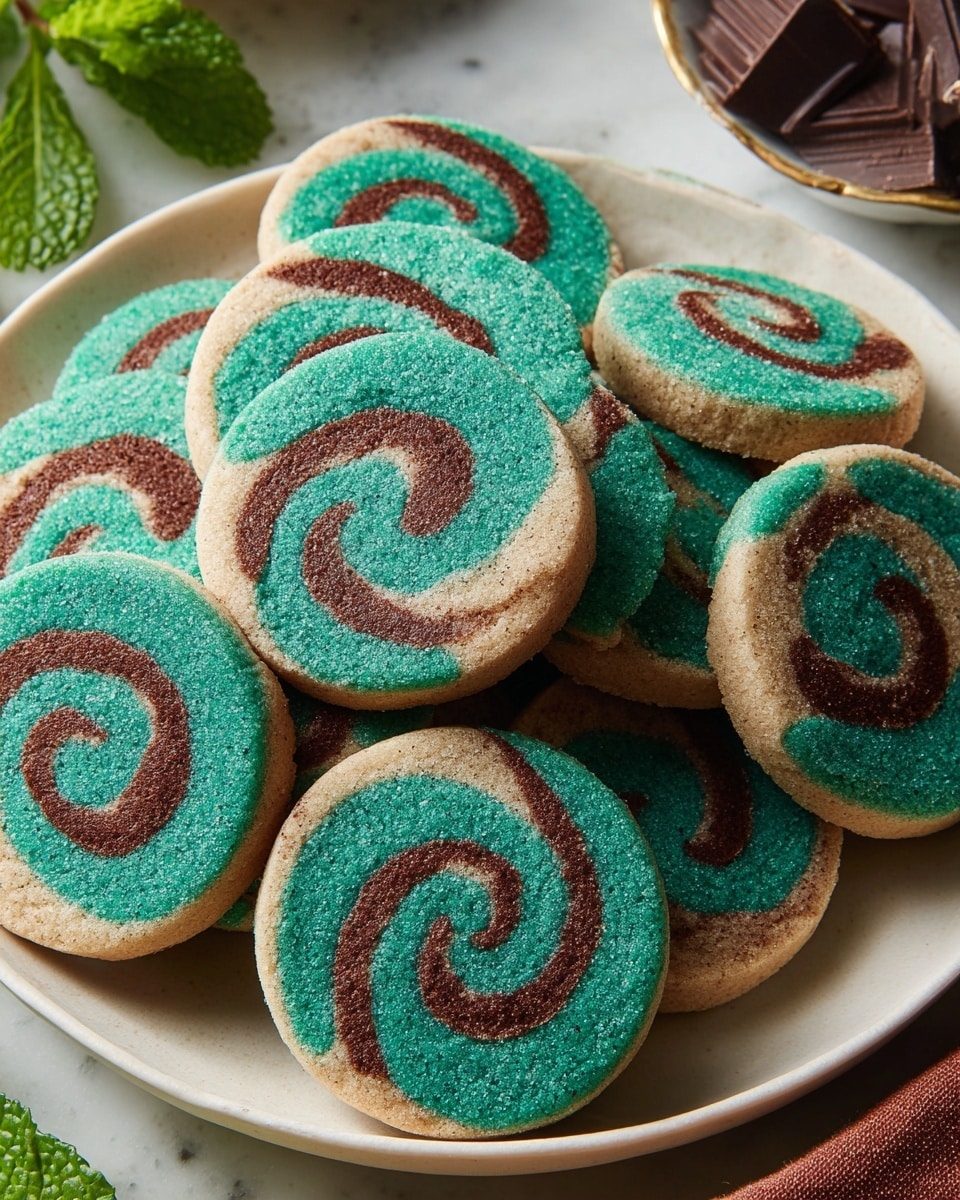
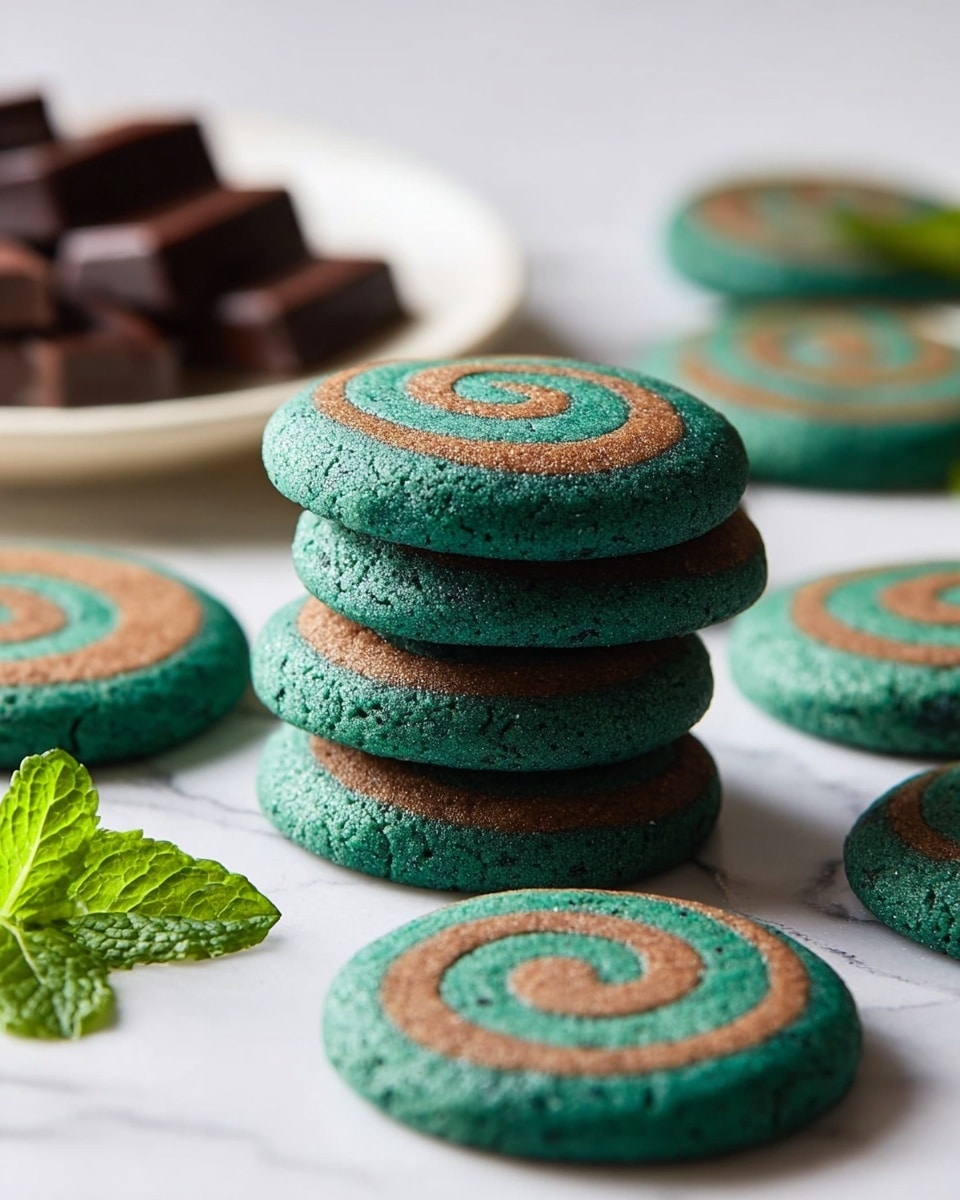
Chocolate Mint Pinwheel Cookies are a festive treat combining rich cocoa with refreshing peppermint. These visually striking cookies offer a perfect balance of flavors and a delightful spiral design that’s sure to impress family and friends.
Ingredients
- 2 1/4 cups (286 grams) all-purpose flour
- 1/2 teaspoon baking powder
- 1/4 teaspoon fine sea salt
- 2 sticks (226 grams) unsalted butter, at cool room temperature
- 3/4 cup (150 grams) granulated sugar
- 1 large egg, at cool room temperature
- 1 teaspoon peppermint extract
- 1/2 teaspoon vanilla extract
- ¼-½ teaspoon green gel food coloring
- 3 tablespoons (16 grams) unsweetened cocoa powder
- 1 tablespoon milk
Instructions
- Step 1: In a medium bowl, whisk together the flour, baking powder, and salt.
- Step 2: In a large bowl, beat the butter and sugar with an electric mixer on medium-high speed until smooth and well combined, about 2 minutes. Scrape down the sides and bottom of the bowl.
- Step 3: Add the egg, peppermint extract, and vanilla extract to the butter mixture and beat until combined. Scrape down the bowl again.
- Step 4: On low speed, gradually add the flour mixture and mix until just incorporated.
- Step 5: Divide the dough in half and place one half in a small bowl. Add green gel food coloring starting with ¼ teaspoon, mixing with a spatula until evenly colored. Add more if desired.
- Step 6: To the remaining plain dough, add cocoa powder and milk, then beat on low speed until just combined.
- Step 7: Place each half of dough onto a sheet of plastic wrap. Wrap and shape each into a small rectangle. Refrigerate until firm but pliable, about 1 hour.
- Step 8: Place a sheet of parchment paper over a silicone-lined baking mat. Place one dough half on top and cover with plastic wrap. Roll into an 8×14-inch rectangle about 1/4-inch thick. Repeat with the other dough half. Chill both rectangles until firm but pliable, about 10 minutes.
- Step 9: Remove plastic wrap from the green dough and place it on a fresh parchment sheet. Carefully peel away the parchment attached to the dough. Repeat with the chocolate dough, layering it on top of the green dough as evenly as possible. Press gently to seal the layers together. Trim edges to form a neat rectangle if needed.
- Step 10: Using the parchment under the green dough as a guide, roll the dough tightly along the long side into a log, ensuring no gaps form between layers. Wrap the log in parchment or plastic wrap and freeze for 1 hour or until firm.
- Step 11: Preheat the oven to 350°F (175°C) and line large baking sheets with parchment paper.
- Step 12: Using a sharp knife, trim the edges of the dough log, then slice into 1/2-inch thick slices. Arrange the slices on the prepared baking sheets, spacing them 2 inches apart. If slices are slightly flat on the bottom, that’s okay; they will bake up round.
- Step 13: Place the baking sheets in the fridge or freezer while the oven finishes preheating.
- Step 14: Bake the cookies for 10 to 12 minutes or until set. Let them cool on the baking sheets for 2 minutes, then transfer to wire racks to cool completely.
Tips & Variations
- Use gel food coloring for vibrant green without adding extra liquid to the dough.
- For a stronger mint flavor, increase peppermint extract slightly but avoid overpowering the dough.
- Try substituting the peppermint extract with spearmint for a milder mint taste.
- If you prefer, roll the dough rectangles between two sheets of parchment to avoid sticking.
Storage
Store the cookies in an airtight container at room temperature for up to 5 days. For longer storage, freeze them for up to 1 month. When ready to enjoy, let frozen cookies thaw at room temperature to retain their softness. They may soften the longer they sit, so enjoy fresh for the best texture.
How to Serve
Serve this delicious recipe with your favorite sides.
FAQs
Can I make the dough ahead of time?
Yes, you can prepare the dough layers and roll them into a log, then freeze for up to a month. Thaw in the fridge before slicing and baking.
What if I don’t have peppermint extract?
You can substitute with vanilla extract alone or use another mint-flavored extract, but peppermint gives the classic mint flavor that pairs uniquely with chocolate.
PrintChocolate Mint Pinwheel Cookies Recipe

These Chocolate Mint Pinwheel Cookies are a festive and flavorful treat combining rich cocoa with refreshing peppermint essence. Crafted with a smooth buttery dough in vibrant green and chocolate layers, they are rolled into charming pinwheels perfect for holiday gatherings or any special occasion. The cookies are crisp on the edges yet tender inside, delivering a delightful balance of chocolate and mint in every bite.
- Prep Time: 20 minutes
- Cook Time: 12 minutes
- Total Time: 1 hour 40 minutes
- Yield: Approximately 36 cookies 1x
- Category: Dessert Cookies
- Method: Baking
- Cuisine: American
- Diet: Vegetarian
Ingredients
Dry Ingredients
- 2 1/4 cups (286 grams) all-purpose flour
- 1/2 teaspoon baking powder
- 1/4 teaspoon fine sea salt
- 3 tablespoons (16 grams) unsweetened cocoa powder
Wet Ingredients
- 2 sticks (226 grams) unsalted butter, at cool room temperature
- 3/4 cup (150 grams) granulated sugar
- 1 large egg, at cool room temperature
- 1 teaspoon peppermint extract
- 1/2 teaspoon vanilla extract
- 1 tablespoon milk
- ¼–½ teaspoon green gel food coloring
Instructions
- Mix Dry Ingredients: In a medium bowl, whisk together the flour, baking powder, and salt to ensure even distribution of leavening agents and salt.
- Cream Butter and Sugar: In a large bowl, use an electric mixer to beat the butter and sugar on medium-high speed until light and smooth, about 2 minutes, scraping down the sides and bottom to maintain even mixing.
- Add Egg and Extracts: Beat in the egg, peppermint extract, and vanilla extract until fully incorporated, then scrape down the bowl again for thorough mixing.
- Combine Dry with Wet: On low speed, gradually add the flour mixture to the wet ingredients and mix just until combined to avoid overworking the dough.
- Divide and Color Dough: Divide dough into two halves. Add green gel food coloring starting with ¼ teaspoon to one half and mix evenly with a spatula, adding more if needed for desired color. To the remaining plain dough, add cocoa powder and milk; beat gently on low speed until combined.
- Shape Dough and Chill: Place each dough half on plastic wrap, shape into small rectangles, wrap tightly, and refrigerate until firm yet pliable, about 1 hour.
- Roll Dough Sheets: On a silicone-lined baking mat covered with parchment, roll each dough half into an 8×14-inch rectangle approximately 1/4-inch thick, covering with plastic wrap to prevent drying. Chill the rolled dough pieces in the fridge or freezer for about 10 minutes until firm but pliable.
- Layer Dough: Remove plastic wrap from the green dough and place it on fresh parchment. Peel the original parchment off the dough. Layer the chocolate dough over the green dough as evenly as possible, pressing gently to eliminate gaps. Trim edges for an even rectangle if needed.
- Roll into Pinwheel: Using the parchment under the green dough as a guide, carefully roll the dough from the long side into a tight log, ensuring no air gaps. Wrap the log in parchment or plastic wrap and freeze for 1 hour until firm.
- Prepare for Baking: Line large baking sheets with parchment paper. Trim edges of the dough log, then slice into 1/2-inch thick slices using a sharp knife. Arrange the cookies on the baking sheets spaced 2 inches apart. Chill the baking sheets in the fridge or freezer while preheating the oven.
- Bake Cookies: Preheat oven to 350°F (175°C). Bake cookies for 10 to 12 minutes until set but not browned. Cool on baking sheets for 2 minutes, then transfer to wire racks to cool completely.
- Store Cookies: Store cooled cookies in an airtight container at room temperature for up to 5 days or freeze for up to 1 month. Note that cookies will soften over time.
Notes
- Use gel food coloring to avoid altering the dough consistency compared to liquid food coloring.
- Chilling dough layers before rolling helps maintain the shape of the pinwheels during baking.
- Do not overmix the dough after adding flour to ensure tender cookies.
- If dough gets too soft while working, refrigerate briefly to firm up.
- Slicing frozen dough log is easier and yields cleaner pinwheel shapes.
- Cookies soften if stored at room temperature for several days; freezing preserves firmness.
Keywords: chocolate mint cookies, pinwheel cookies, peppermint cookies, holiday cookies, layered cookies, festive cookies


