Easy Coffee & Almond Milk Steamed Buns with Creamy Coffee Paste Filling Recipe
Introduction
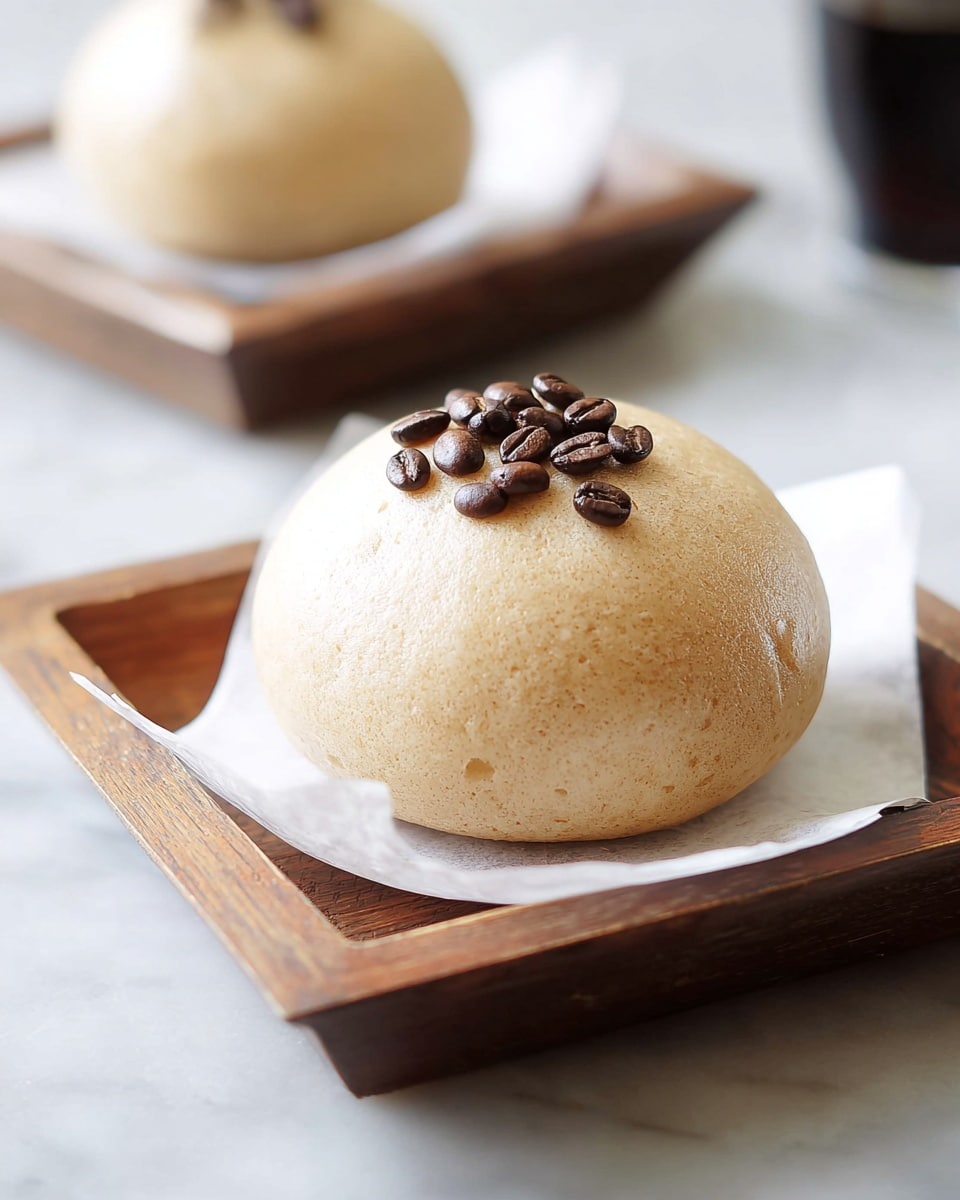
These Easy Coffee & Almond Milk Steamed Buns with Creamy Coffee Paste Filling offer a delightful twist on traditional steamed buns. Soft, fluffy, and infused with rich coffee flavor, they make a perfect treat for breakfast or afternoon tea.
Ingredients
- 4 cups bread flour (480 g), sifted and leveled
- 1 tsp instant yeast
- 3 Tbsp granulated sugar
- 1/2 tsp salt
- 1 1/2 tsp baking powder
- 1 1/3 cups unsweetened almond milk (320 g), unsweetened original
- 2 Tbsp instant coffee granules
- 1 Tbsp light olive oil (or melted coconut oil or avocado oil)
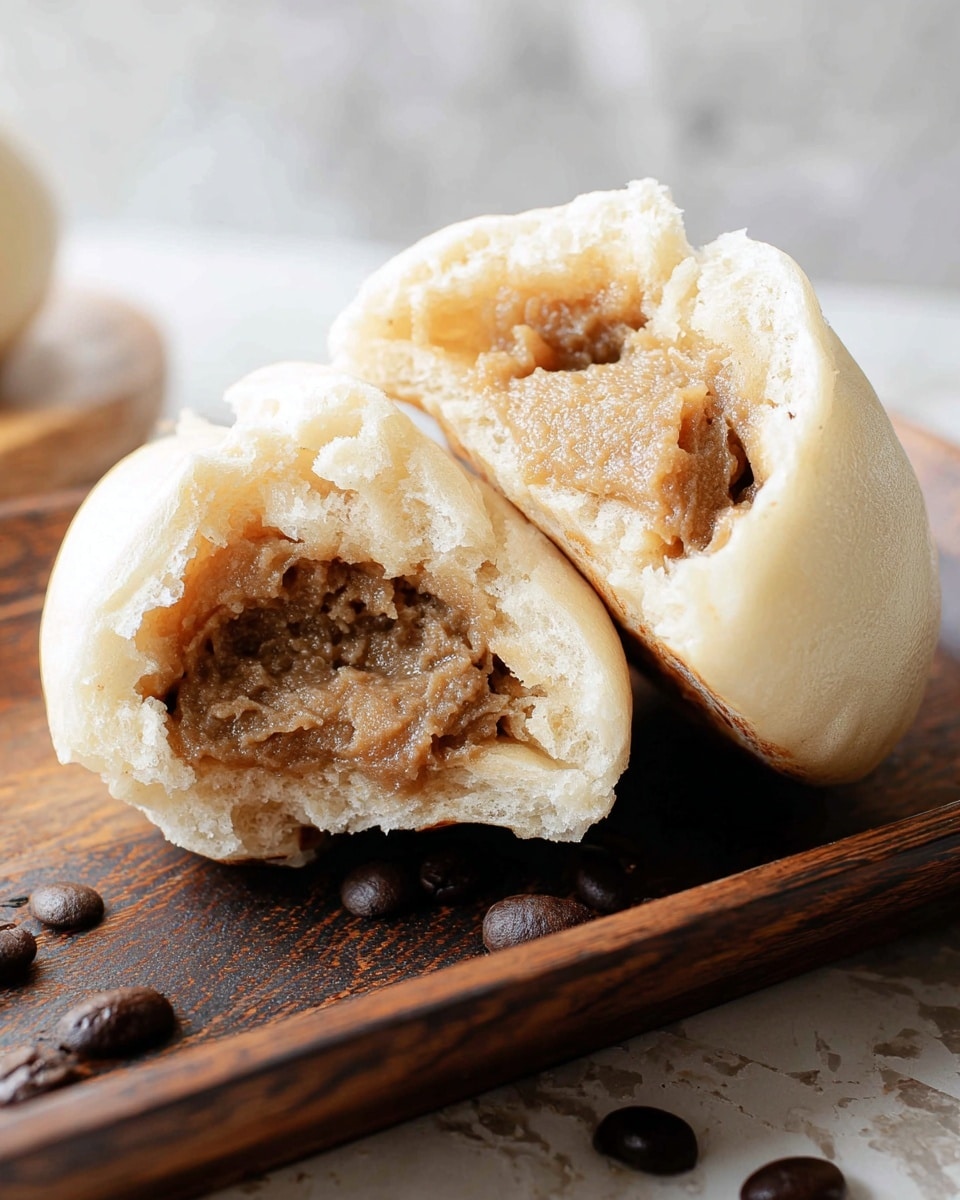
- 500 g coffee bean paste
Instructions
- Step 1: Heat the almond milk in a microwave-safe bowl or glass measuring cup until hot, about 2 minutes.
- Step 2: Stir the instant coffee granules into the hot almond milk until completely dissolved. Let cool until warm but not hot, then set aside.
- Step 3: In the bowl of a stand mixer, mix the bread flour, instant yeast, sugar, salt, and baking powder.
- Step 4: Pour the warm coffee almond milk into the dry ingredients.
- Step 5: Knead the dough on a low setting (speed 2) for about 1 minute until mostly combined.
- Step 6: Add the olive oil and continue kneading for 8 to 10 minutes, until the dough forms a smooth, supple ball and pulls away from the bowl.
- Step 7: If needed, adjust the dough with 1-2 tablespoons extra almond milk or bread flour depending on flour protein content and kitchen conditions.
- Step 8: Remove the dough from the mixer and place it in a lightly greased bowl.
- Step 9: Cover the bowl and let the dough rise until doubled in size, about 60 to 90 minutes.
- Step 10: Punch down the dough, then place it on a floured surface and divide into 12 to 14 equal pieces.
- Step 11: Wrap each dough piece around a portion of the coffee bean paste filling, then place each bun on a square of parchment or steamer paper.
- Step 12: Cover the buns and let them rise for 20 to 30 minutes.
- Step 13: Meanwhile, boil water and prepare your steamer.
- Step 14: Transfer the buns to the steaming pan and steam for 15 minutes.
- Step 15: Serve and enjoy your coffee-flavored steamed buns fresh and warm.
Tips & Variations
- You can substitute granulated sugar with brown sugar or coconut sugar for a deeper flavor.
- If you don’t have instant coffee granules, strong brewed espresso can be reduced and used instead.
- For a dairy alternative, almond milk works well, but oat or soy milk can also be used.
- Try swapping olive oil with melted coconut or avocado oil for a subtle flavor variation.
Storage
Store steamed buns well wrapped at room temperature for up to 1 day. For longer storage, place the buns in a plastic freezer bag or airtight container and freeze for up to 3 months. To enjoy, defrost at room temperature or steam them again for 10 minutes to refresh.
How to Serve
Serve this delicious recipe with your favorite sides.
FAQs
Can I use regular milk instead of almond milk?
Yes, regular milk can be used if you’re not avoiding dairy. It will still create soft steamed buns but may change the flavor slightly.
What can I use if I don’t have coffee bean paste?
You can use sweetened red bean paste, black sesame paste, or even chocolate spread as an alternative filling for a different but delicious taste.
PrintEasy Coffee & Almond Milk Steamed Buns with Creamy Coffee Paste Filling Recipe

These Easy Coffee & Almond Milk Steamed Buns feature a soft and fluffy homemade dough infused with rich coffee flavor, wrapped around a creamy coffee bean paste filling. Lightly sweetened and vegan-friendly, these steamed buns are a delightful fusion of Asian-inspired technique and coffeehouse flavors, perfect for breakfast or an afternoon treat.
- Prep Time: 20 minutes
- Cook Time: 15 minutes
- Total Time: 2 hours 15 minutes
- Yield: 12–14 steamed buns 1x
- Category: Snack
- Method: Steaming
- Cuisine: Asian Fusion
- Diet: Vegan
Ingredients
Dough
- 4 cups bread flour (480 g), sifted and leveled
- 1 tsp instant yeast
- 3 Tbsp granulated sugar
- 1/2 tsp salt
- 1 1/2 tsp baking powder
- 1 1/3 cups unsweetened almond milk (320 g), unsweetened original
- 2 Tbsp instant coffee granules
- 1 Tbsp light olive oil (or melted coconut oil or avocado oil)
Filling
- 500 g coffee bean paste
Instructions
- Heat Almond Milk and Dissolve Coffee: Heat the almond milk in a microwave-safe bowl or glass measuring cup until hot, about 2 minutes. Stir in the instant coffee granules until completely dissolved. Let the mixture cool so it is warm but not hot, then set aside.
- Mix Dry Ingredients: In the bowl of a stand mixer, combine bread flour, instant yeast, granulated sugar, salt, and baking powder.
- Add Coffee Almond Milk: Pour the warm coffee almond milk into the dry ingredients. Begin kneading on low speed (speed 2) for about 1 minute to combine.
- Add Oil and Knead Dough: Add the olive oil and continue kneading for 8 to 10 minutes, or until the dough pulls away from the bowl and forms a smooth, supple ball. Adjust with 1-2 tablespoons more almond milk or bread flour if needed, depending on flour protein content and kitchen humidity.
- First Rise: Remove dough from the mixer bowl, place it in a lightly greased bowl, cover, and let it rise until doubled in size, about 60-90 minutes.
- Divide and Shape: Once risen, punch down the dough and transfer to a generously floured surface. Divide the dough into 12-14 equal pieces.
- Fill and Shape Buns: Wrap each dough piece around the prepared coffee bean paste filling, sealing well. Place each bun on a square of parchment or steamer paper.
- Second Rise: Cover the filled buns and let them rise for another 20-30 minutes.
- Prepare Steamer and Steam: Meanwhile, bring water to a boil and prepare the steamer. Transfer the buns to the steaming pan and steam for 15 minutes until cooked through and fluffy.
- Serve and Enjoy: Remove buns from the steamer and enjoy warm.
- Storage Notes: Store steamed buns well wrapped at room temperature for up to 1 day. For longer storage, freeze in an airtight container or plastic bag for up to 3 months. Reheat by steaming for 10 minutes before serving to enjoy freshly steamed texture.
Notes
- Sift and level bread flour for accurate measurement to ensure proper dough texture.
- You can substitute granulated sugar with coconut sugar or other preferred sweeteners, but adjust sweetness and moisture as needed.
- Adjust the amount of almond milk or flour used depending on the humidity and protein content of your flour to achieve a supple dough.
- Steamer paper or parchment squares prevent buns from sticking during steaming.
- Use a stand mixer with a dough hook for kneading, or knead by hand for best results.
- The coffee bean paste filling is readily available in Asian grocery stores or specialty shops; you can substitute with any sweet bean paste or a chocolate spread if preferred.
Keywords: coffee steamed buns, almond milk buns, vegan steamed buns, coffee bean paste, Asian steamed buns, homemade steamed buns


