No-Bake Reese’s Peanut Butter Cup Pie Recipe
Introduction
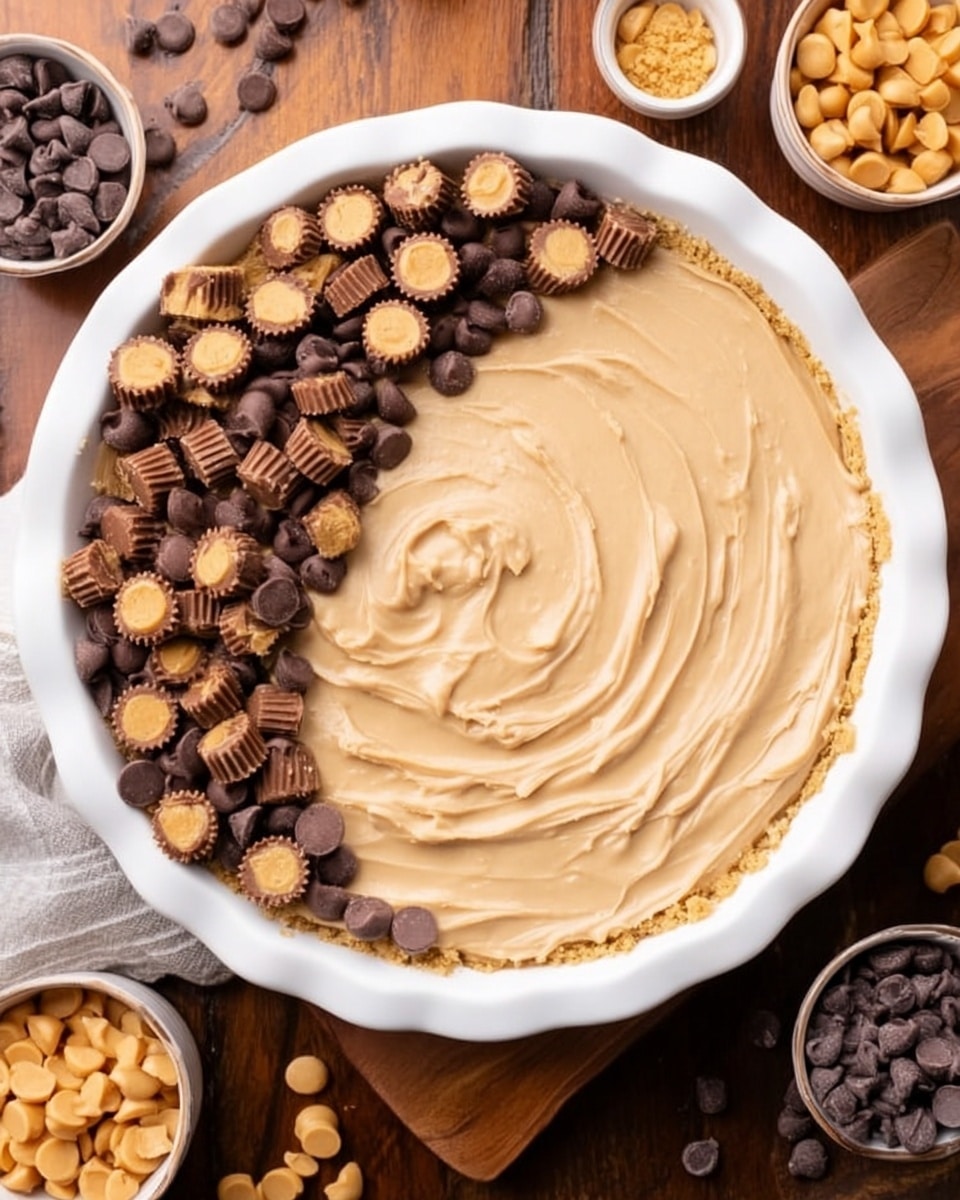
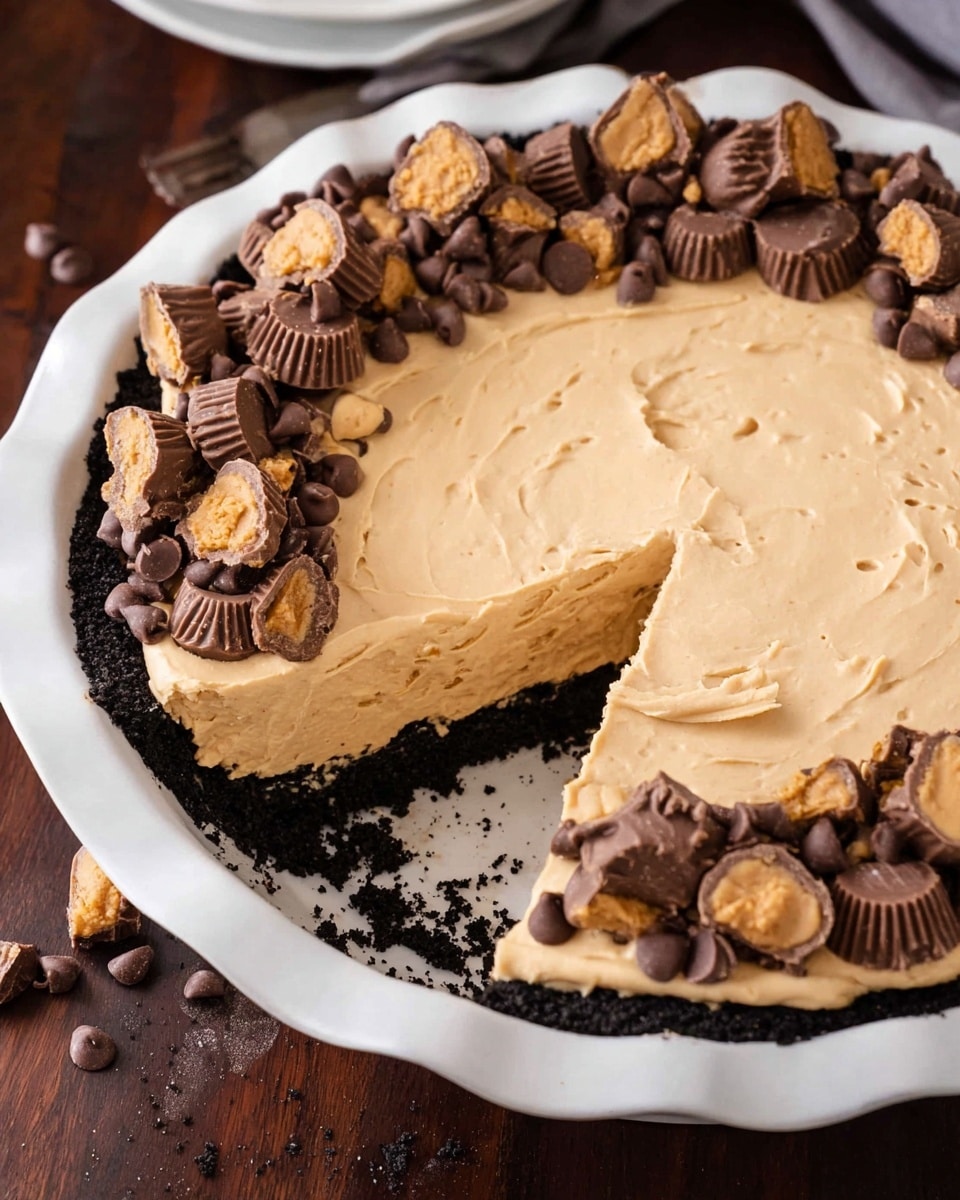
This Easy Reese’s Peanut Butter Cup Pie is a no-bake delight that’s perfect for any peanut butter and chocolate lover. With a crunchy Oreo crust and a creamy, rich filling, it’s simple to make yet irresistibly delicious. It’s a crowd-pleaser that requires no oven and minimal effort.
Ingredients
- 20 ounces chocolate sandwich cookies (I used Oreo’s)
- 6 tablespoons butter, melted
- 1½ cups heavy cream
- 8 ounces cream cheese, softened
- ¾ cup granulated sugar
- 1 cup smooth and creamy peanut butter
- 1 tablespoon vanilla extract
- ⅛ teaspoon coarse kosher salt
- Peanut butter chips (for garnish)
- Chocolate chips (for garnish)
- Mini Reese’s Peanut Butter Cups (for garnish)
Instructions
- Step 1: Crush the chocolate sandwich cookies into a fine crumble using a food processor or by placing them in a large Ziplock bag and crushing with a rolling pin. Mix the cookie crumbs with the melted butter until fully combined.
- Step 2: Press the cookie mixture firmly into the bottom of an 8″ or 9″ pie dish to form the crust. Place the dish in the freezer while you prepare the filling.
- Step 3: In a large bowl, beat the heavy cream until stiff peaks form. Set aside.
- Step 4: In another large bowl, beat the softened cream cheese and granulated sugar together for 1-3 minutes until completely smooth and combined.
- Step 5: Add the peanut butter, vanilla extract, and kosher salt to the cream cheese mixture. Beat for another 1-3 minutes until fully incorporated.
- Step 6: Gently fold the whipped heavy cream into the peanut butter mixture using a spatula until no streaks remain.
- Step 7: Pour the filling into the prepared cookie crust and spread evenly.
- Step 8: Garnish the top of the pie with peanut butter chips, chocolate chips, and mini Reese’s Peanut Butter Cups as desired.
- Step 9: Cover the pie and refrigerate for 2-3 hours to allow it to set properly before serving.
Tips & Variations
- Whip the heavy cream to very stiff peaks for the best texture and structure in your pie filling.
- Soften the cream cheese by leaving it out at room temperature for 30-60 minutes or warming it slightly in the microwave to ensure smooth mixing.
- For a finer crust, crush cookies thoroughly; larger cookie pieces can make the crust uneven and crumbly.
- Feel free to use a tart pan with a removable bottom as an alternative to a pie dish.
- Add as many or as few peanut butter and chocolate chips or Reese’s cups as you like for garnish; this won’t affect the basic recipe.
Storage
Store the pie covered in the refrigerator for up to 3 days. Reheat is not recommended as this is a no-bake chilled dessert. Before serving, you may want to let it sit at room temperature for about 10 minutes for creamier slices.
How to Serve
Serve this delicious recipe with your favorite sides.
FAQs
Can I use regular peanut butter instead of smooth and creamy?
Yes, but creamy peanut butter blends better into the filling for a smoother texture. Chunky peanut butter will add texture but may affect the smoothness of the filling.
Is this pie suitable for freezing?
Freezing is not recommended as the texture of the cream cheese and whipped cream filling can change and become grainy when thawed.
PrintNo-Bake Reese’s Peanut Butter Cup Pie Recipe

This Easy Reese’s Peanut Butter Cup Pie is a no-bake, creamy dessert combining a crunchy chocolate cookie crust with a rich peanut butter and cream cheese filling. Topped with peanut butter chips, chocolate chips, and mini Reese’s Peanut Butter Cups, this pie is perfect for peanut butter and chocolate lovers seeking a simple yet indulgent treat.
- Prep Time: 20 minutes
- Cook Time: 0 minutes
- Total Time: 2 hours 20 minutes
- Yield: 8 servings 1x
- Category: Dessert
- Method: No-Cook
- Cuisine: American
Ingredients
Crust
- 20 ounces chocolate sandwich cookies (such as Oreos)
- 6 tablespoons butter, melted
Filling
- 1½ cups heavy cream
- 8 ounces cream cheese, softened
- ¾ cup granulated sugar
- 1 cup smooth and creamy peanut butter
- 1 tablespoon vanilla extract
- ⅛ teaspoon coarse kosher salt
Toppings
- Peanut butter chips (amount to taste, approx. ½ cup for nutrition)
- Chocolate chips (amount to taste, approx. ½ cup for nutrition)
- Mini Reese’s Peanut Butter Cups (amount to taste, approx. 1 cup for nutrition)
Instructions
- Prepare the crust: Crush the chocolate sandwich cookies into a fine crumble using a food processor or by placing them in a large Ziplock bag and crushing them with a rolling pin. Mix in the melted butter until fully combined.
- Form the crust: Transfer the cookie crumb mixture to an 8″ or 9″ pie dish and press it evenly along the bottom and sides to form the crust. Place the pie dish into the freezer to set while you prepare the filling.
- Whip the cream: In a large bowl, beat the heavy cream until stiff peaks form. Set aside the whipped cream.
- Mix cream cheese and sugar: In another large bowl, beat together the softened cream cheese and granulated sugar for 1–3 minutes until fully combined and smooth.
- Add peanut butter mixture: Add the smooth peanut butter, vanilla extract, and coarse kosher salt to the cream cheese mixture. Beat for another 1–3 minutes until everything is well incorporated.
- Combine whipped cream and peanut butter mixture: Gently fold the whipped cream into the peanut butter mixture using a spatula, folding carefully until no streaks remain to maintain the airy texture.
- Assemble the pie: Pour the filling into the prepared crust in the pie dish and smooth the top with a spatula.
- Garnish: Sprinkle peanut butter chips, chocolate chips, and mini Reese’s Peanut Butter Cups over the filling as desired.
- Chill to set: Cover the pie and refrigerate for 2 to 3 hours to allow the filling to firm up before serving.
Notes
- Whip the heavy cream to very stiff peaks; this step is essential for the pie’s structure and texture.
- Soften the cream cheese before mixing either by letting it sit at room temperature for 30–60 minutes or microwaving briefly to ensure smooth incorporation.
- Allow the pie to chill for the full 2–3 hours to properly set; chilling less will result in a soft filling that’s harder to slice.
- Crush cookies finely to avoid large chunks that compromise the crust’s texture and integrity.
- This recipe works well with a tart pan with a removable bottom as an alternative to a pie dish.
- The amounts of peanut butter chips, chocolate chips, and mini Reese’s cups can be adjusted according to your preference. Nutrition info assumes about ½ cup each of peanut butter and chocolate chips and 1 cup of mini Reese’s cups.
Keywords: Reese’s, peanut butter cup pie, no-bake pie, peanut butter dessert, chocolate peanut butter pie, easy pie recipe, no-bake dessert

