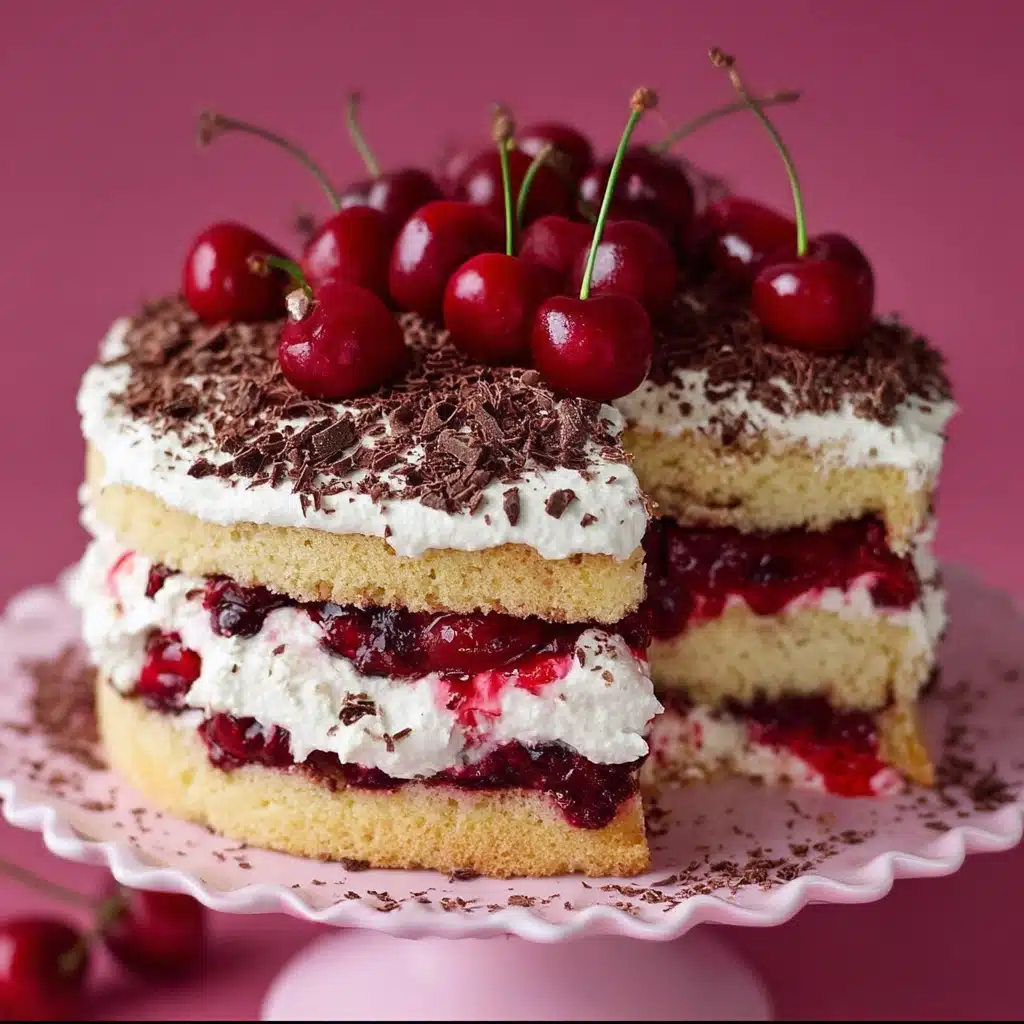
Russian Cherry Layer Cake Recipe
This Russian Cherry Layer Cake Recipe is a showstopping dessert that’s destined to become the star of your next celebration. Fluffy sponge cake layers soaked with a delicate cherry syrup, paired with a rich dulce de leche whipped cream, and crowned in a stunning chocolate-cherry finish—this is the kind of cake that brings both “wow” and “yum” to the table. With every forkful, you get a playful blend of textures and flavors, from the almost cloud-like cocoa crumb to the tangy cherries and the silky, creamy frosting. If you’re searching for a cake that’s both nostalgic and utterly unique, the Russian Cherry Layer Cake Recipe is guaranteed to steal the spotlight.
Ingredients You’ll Need
This glorious layer cake relies on a handful of straightforward, but carefully chosen ingredients. Each plays a starring role—whether it’s adding richness, creating that soft crumb, or delivering a burst of vibrant cherry flavor. Take a peek at what you’ll need to make the Russian Cherry Layer Cake Recipe sing.
- Eggs (15 large, separated): The foundation for a light but sturdy sponge—make sure they’re at room temperature for best results.
- Sugar (1 ½ cups): Provides sweetness and helps create a tender crumb in the cake layers.
- All-purpose flour (1 ¾ cups, unbleached): The key to structure and that classic, delicate cake texture.
- Unsweetened cocoa powder (3 tablespoons): Adds depth and creates a beautifully rich chocolate layer.
- Country cherry pie filling/topping (21 oz.): Brings that juicy cherry tang running through the cake.
- Cold water (1 ¾ cups): Used to create a wonderfully moist syrup for soaking the layers.
- Sugar (1 tablespoon): Just a hint melds the cherry syrup together for perfect sweetness.
- Dulce de leche (1 can, cooked sweetened condensed milk): Infuses the frosting with creamy caramel warmth.
- Cold heavy whipping cream (3 cups): Whips up tall and billowy for that dreamy frosting finish.
- Chocolate shavings (optional): For an extra touch of visual drama and chocolatey richness.
- Cordial cherries (optional): These are the cherry on top—literally!—for pure fancy-cake flair.
How to Make Russian Cherry Layer Cake Recipe
Step 1: Bake the Cake Layers
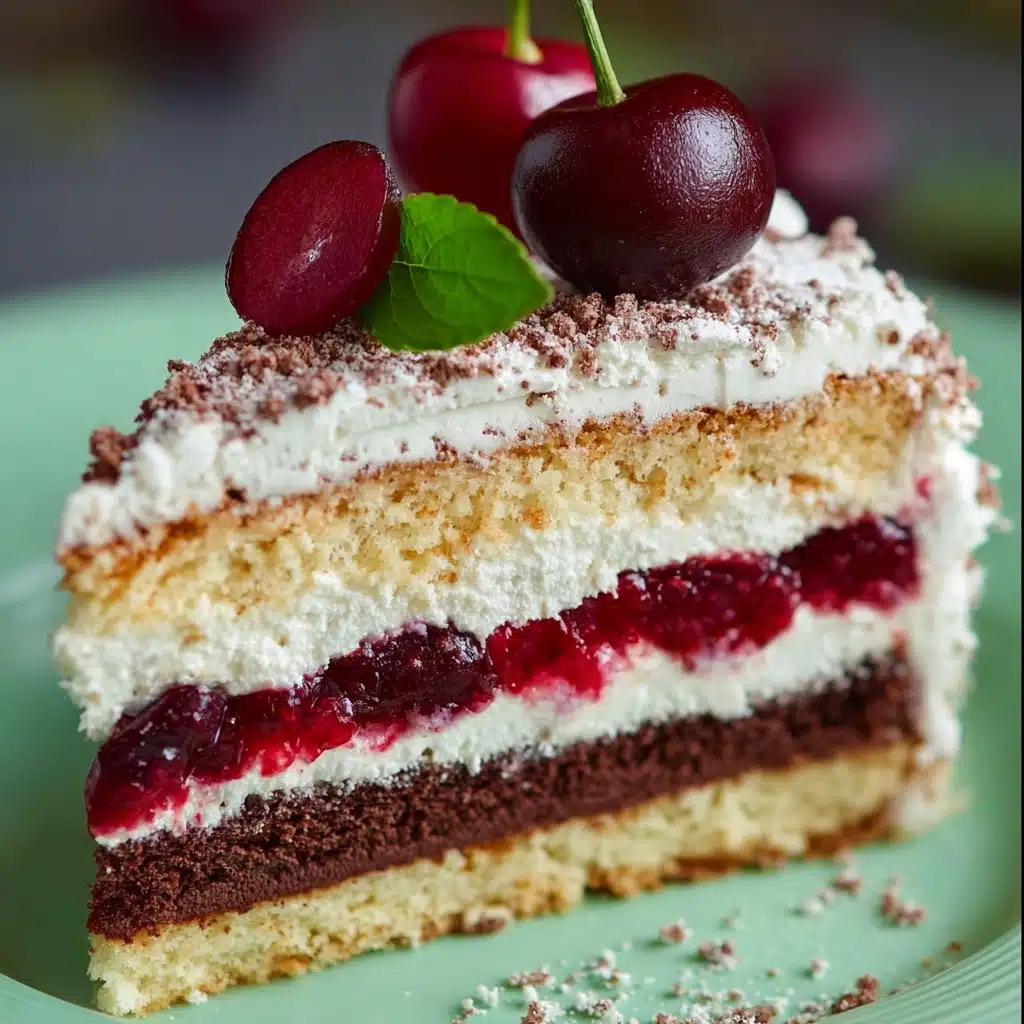
Preheat your oven and line three round cake pans with parchment paper. Begin by whisking all your egg yolks and sugar together in a large bowl until pale and creamy—this is the secret to a soft, springy crumb! Gently stir in the flour, being careful not to overmix. In a separate bowl, beat those egg whites until they’re three times the volume and holding cloud-like peaks; this will give your layers lovely lift. Next, gently fold the yolk mixture into the whites to keep every bit of air in. Take a third of the batter and blend in the cocoa powder, creating that signature chocolate layer. Pour the batters into the prepared pans—cocoa goes in one, plain in the others—and bake for about 23 to 25 minutes. Cakes are ready when golden and a toothpick comes out clean. Pop them out, peel away the parchment while they’re warm, and let them cool on a rack.
Step 2: Prepare the Cherry Syrup
Pour your cherry pie filling into a medium bowl with the cold water. Using a slotted spoon, fish out all the cherries and give them a gentle squeeze to remove excess juice—set aside both fruit and liquid. Stir a tablespoon of sugar into the reserved syrup; this will be your soaking liquid, ensuring each layer is moist, flavorful, and undeniably delicious.
Step 3: Whip the Dulce de Leche Frosting
Chill your mixing bowl and whisk attachment in the freezer for 10-15 minutes—this is your secret weapon for lofty whipped cream! Beat the cold heavy cream until you see stiff peaks forming. Drop the mixer to low and, tablespoon by tablespoon, blend in that luscious dulce de leche until silky smooth. This frosting is outrageously creamy, with the perfect hit of caramel to balance the tangy cherries. Keep it in the fridge until you’re ready to assemble.
Step 4: Build the Russian Cherry Layer Cake Recipe
On your prettiest serving plate, place one white cake layer face-down. Slowly drizzle half the cherry syrup over the surface—watch it soak in and add irresistible moisture and flavor! Next, take your chocolate layer and crumble it into a bowl. Fold in the strained cherries and a third of the frosting, creating a thick cherry-chocolate mixture. Spread this over the syrup-soaked layer, going right to the edges. Add the second white cake layer, face-down, and pour the rest of the syrup evenly over top. Let it soak for 10 glorious minutes, and if the edges are uneven, just trim them for a super-neat finish.
Step 5: Frost, Decorate, and Chill
Coat the entire cake—top and sides—with that luxe dulce de leche cream, swirling it to create lovely swoops. For the grand finale, sprinkle with chocolate shavings and crown with cordial cherries if you want true bakery-style drama. Now, into the fridge it goes for at least two hours, letting all those flavors meld and the cake set to sliceable perfection.
How to Serve Russian Cherry Layer Cake Recipe
Garnishes
This gorgeous cake loves to shine with a little extra flair! Dust it generously with more chocolate shavings for an irresistible look and a subtle bittersweet contrast to the sweet filling. Cordial cherries dotted along the top give an elegant, celebratory finish that hints at the flavors inside. If you’re feeling fancy, a light scatter of powdered sugar or a few fresh mint leaves are simple but striking touches.
Side Dishes
With the Russian Cherry Layer Cake Recipe front and center, keep sides light and refreshing. A bowl of tart, fresh berries or a scoop of cherry sorbet provides a lovely counterpoint to this layered treat. If you’re hosting for a crowd, serve up tiny cups of espresso or rich black tea—the cake’s creamy layers and fruitiness are a match made in dessert heaven.
Creative Ways to Present
For individual flair, slice the cake into squares instead of wedges and serve them on tiny dessert plates with an extra drizzle of cherry syrup. Or, go ultra-decadent: serve each slice with a dollop of whipped crème fraîche and a sprinkle of toasted nuts. For birthdays or special occasions, stack your slices with extra cherry filling in between and build a “mini trifle” in glass jars—every spoonful delivers all the cake’s layers in a charming, portable way.
Make Ahead and Storage
Storing Leftovers
If (miraculously) you have leftovers, rest assured: this cake keeps beautifully in the fridge for up to three days. Just cover with plastic wrap or store in an airtight container to prevent the cake from absorbing any fridge odors, and the layers will stay moist and flavorful.
Freezing
You can freeze the fully assembled Russian Cherry Layer Cake Recipe—simply slice it first and wrap each piece tightly in plastic wrap, then foil. Place the wrapped slices in a zip-top bag and freeze for up to a month. Thaw individual slices in the fridge overnight for a delicious treat whenever a cherry cake craving strikes!
Reheating
This cake is truly divine served cold straight from the fridge, but if you prefer it a tad closer to room temperature, just let slices sit out for 15–20 minutes before serving. There’s no need to microwave or bake—doing so would melt that lovely whipped cream frosting.
FAQs
Can I use fresh cherries instead of pie filling?
Absolutely! If cherries are in season, pit and halve about 2 ½ cups of fresh cherries, cook them briefly with a little sugar until tender, and use both the fruit and their syrup as directed. The Russian Cherry Layer Cake Recipe will taste even more vibrant this way.
What if I don’t have dulce de leche?
No worries—homemade works beautifully! Simmer a can of sweetened condensed milk until caramelized, or use store-bought caramel sauce in a pinch, though the flavor will be lighter.
Can this cake be made in advance?
Yes! In fact, the Russian Cherry Layer Cake Recipe tastes even better after a few hours (or overnight) in the fridge, when the layers have had a chance to meld. Just keep it well covered and chilled until you’re ready to serve.
Is this recipe gluten-free?
As written, it uses standard all-purpose flour, so it’s not gluten-free. However, a quality gluten-free flour blend can often be substituted 1:1 for cakes like this, yielding lovely results with just a tiny adjustment in texture.
Can I make smaller cakes or cupcakes with this batter?
Definitely! Divide the batter among cupcake tins or mini cake pans, adjusting the baking time (start checking at 15 minutes). Decorate each individually for a delightful twist on the classic Russian Cherry Layer Cake Recipe.
Final Thoughts
If there ever was a dessert to celebrate with, it’s this. The Russian Cherry Layer Cake Recipe is pure delight—loaded with flavor, fun to make, and entirely irresistible at first bite. Give it a try, share it with friends and family, and watch it become a new classic on your dessert table!
PrintRussian Cherry Layer Cake Recipe
Indulge in the rich flavors of this Russian Cherry Layer Cake. With moist cake layers, cherry-infused syrup, and a creamy frosting, this dessert is a showstopper for any occasion.
- Prep Time: 30 minutes
- Cook Time: 25 minutes
- Total Time: 3 hours
- Yield: 1 cake (12-16 servings) 1x
- Category: Dessert
- Method: Baking, Chilling
- Cuisine: Russian
- Diet: Vegetarian
Ingredients
For the Cake Layers:
- 15 large eggs, separated (room temperature)
- 1 ½ cups sugar
- 1 ¾ cups all-purpose flour (unbleached)
- 3 tablespoons unsweetened cocoa powder
For the Syrup:
- 21 oz. country cherry pie filling/topping
- 1 ¾ cups cold water
- 1 tablespoon sugar
For the Frosting:
- 1 can cooked sweetened condensed milk (dulce de leche)
- 3 cups cold heavy whipping cream
For Decoration (Optional):
- Chocolate shavings
- Cordial cherries
Instructions
- Making the Cake Layers: Preheat the oven and prepare three round cake pans by lining them with parchment paper. In a large bowl, whisk the egg yolks with sugar until smooth. Gradually add flour, mixing until well combined. In a separate bowl, beat the egg whites on high speed with an electric mixer until fluffy and tripled in volume, about 2-3 minutes. Gently fold the egg yolk mixture into the egg whites using a spatula. Divide the batter into three parts: reserve one-third for the cocoa layer. Mix the cocoa powder into this portion until fully incorporated. Pour the chocolate batter into one pan and the plain batter into the other two pans. Bake the layers in the center of the oven for 23-25 minutes or until golden and a toothpick inserted into the center comes out clean. Once baked, remove from the pans and peel off the parchment paper while the cakes are still warm. Let them cool completely.
- Preparing the Syrup and Frosting: In a medium bowl, combine the cherry pie filling with water. Remove the cherries using a slotted spoon and press out excess juice. Reserve the juice for the syrup and mix in 1 tablespoon of sugar. Chill the mixing bowl and whisk attachment in the freezer for 10-15 minutes. Whip the cold heavy cream until stiff peaks form, about 3 minutes. Reduce the speed to low and slowly add dulce de leche, 1 tablespoon at a time, until fully incorporated. Refrigerate the frosting until ready to use.
- Assembling the Cake: Place the first white cake layer face-down on a serving plate. Drizzle half of the syrup evenly over it and let it soak. Crumble the chocolate cake layer into a bowl. Mix in the strained cherries and ⅓ of the frosting. Spread this mixture over the soaked first layer. Add the second white cake layer on top, face-down. Drizzle the remaining syrup over this layer and let it soak for 10 minutes. Trim the edges if needed. Spread the frosting evenly over the top and sides of the cake. Decorate with chocolate shavings and cordial cherries, if desired. Refrigerate the cake for at least 2 hours before serving. It can stay fresh in the fridge for up to 3 days.
Notes
- Ensure eggs are at room temperature for better incorporation into the batter.
- Chill mixing bowl and whisk for better results in whipping cream.
- Allow the cake to chill before serving to enhance flavors.
Nutrition
- Serving Size: 1 slice (assuming 1/12 of the cake)
- Calories: 380
- Sugar: 25g
- Sodium: 135mg
- Fat: 21g
- Saturated Fat: 12g
- Unsaturated Fat: 7g
- Trans Fat: 0g
- Carbohydrates: 43g
- Fiber: 1g
- Protein: 7g
- Cholesterol: 155mg
Keywords: Russian Cherry Layer Cake, Cherry Cake, Russian Dessert, Layer Cake Recipe
